Zeek Plumbing starts and finishes projects every single day. However, we do not often have the chance to give the public a glimpse into the stages of work for our plumbers. Zeek Plumbing recently completed a trench drain project for a local client, follow along the project from start to finish below.
Stage #1
The first stage of the project, as well as most projects of this size, requires our crews to be on site to review the entire scope of work and review the customer’s potential plans. A portion of work discussed in this blog is in the top left portion of the picture below. Our expert employees worked through the labor and materials required to complete the project, and a written proposal was completed. After the proposal was approved by the customer, materials were ordered and the project was scheduled.

Stage #2
The labor of the project begins in this stage. Zeek Plumbing cut and removed approximately 75 feet of concrete at 18-24 inches wide for the trench drains installation.


Stage #3
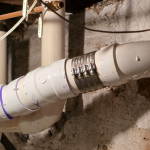
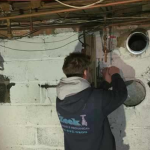
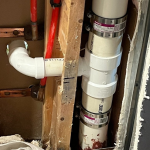
After the saw cutting has been completed, stage 3 of the project begins. Stage 3 consists of the rough for the piping underground. “Rough” or “rough plumbing” is a term used in the plumbing industry typically with new construction and other framing work. The “rough” is always completed before any framing, concrete, or fixtures are installed. Therefore, the rough for this project consists of installing the piping inside the trenches with correct pitch and a cleanout that will be installed flush with the floor. In the following pictures, you will see Rick Zeek completing the rough as well as removing and installing a new cleanout (old cleanout pictured on the right below) at the same location. Rick also used a mini rubber track excavator to remove all the dirt and debris from the trenches.


Stage #4
The next step after all of the rough plumbing has been completed is to install the trench drains. Zeek Plumbing supplied and installed 48 feet of trench drain with stainless steel grates, a floor sink drain for a 3 compartment sink, and a standpipe between machines for discharge. Trench drains need proper pitch just like the piping explained in Stage 3. Concrete must be re-cut and re-patched for any adjustments or repairs. However, our employees understand the importance of completing and finishing jobs correctly the first time.


Stage #5
Patching the trenches, pinning new concrete to the existing floor with steel rebar, and leaving a smooth trowel finish is the last stage of the project. All of the trench drains, piping, and cleanout need to be flush with the concrete. Our main goal with concrete patching is to return the concrete to the condition it was in before cutting. After the new concrete dries, the client should not be able to notice which area was cut.


Zeek Plumbing hopes you enjoyed the peek into our daily lives as plumbers. We hope you are able to see the workmanship and pride behind all of the work we complete. Our office is always available to you at 866-635-0200 to discuss your next plumbing project. Our Book Online Form is also available for any online inquiry into our services. We can assist you with any job from installing a new bathroom faucet to excavating and installing trench drains with stainless steel grates! We hope to hear from you in the future, and stay healthy during this tumultuous time!
Ryan has been a part of the Zeek Plumbing team since 2019, and has lived in Randolph, NJ his entire life.
He takes pride in taking care of the towns, the families, and the areas he grew up in!
Ryan has been the Treasurer and is currently on the Membership committee of a local BNI Chapter based out of Morris County, NJ in the networking group, BNI Main Street.